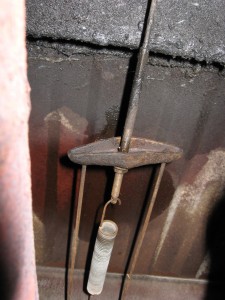
The parking brakes in most vehicles are actuated by cables which stretch over time, because of this all vehicles have a way to adjust the parking brake to compensate for cable stretch. Most vehicles have this adjustment underneath the vehicle at the equalizer bar (the part that splits from the single cable from your in-cab parking brake lever or pedal to the two cables that go to the rear wheels).
Adjusting the parking brake is a very simple process that gives you instant results and is crucial if you have a manual transmission vehicle. The first thing you want to do is thoroughly clean the area as these babies are always filthy. Liberally spray some cleaner up there and then use a wire brush to get the crud off the threads. If your vehicle has spent a significant amount of time in the rust belt (over fifteen minutes) cover it in PB Blaster. When you have cleaned it you should have something that looks like the above photograph.
The adjustment is as simple as tightening the nut that holds the equalizing bar until your cables are tight enough but there are a few more steps to take. First back off the nut until your cables have a lot of slack in them (some vehicles are equipped with a second nut to minimize the chance of the nut rattling off, if this is the case back that one off first).
Once you have done that manually adjust the rear drums by following these instructions.
Now it’s time to do what you came here for. Simply tighten the nut until you feel drag on the rear wheels (I usually lie under the vehicle and use my feet to turn the wheels). Make sure to check both wheels as you can have one free and one tight! Once you feel drag back it off a turn or two. You should notice a much more firm parking brake lever / pedal, if you cannot get the brake to ratchet you will have to loosen the nut until it can. If your vehicle has a double nut make sure to tighten this up against the adjusting nut.
You’re done, now go park on a hill or something.


